
Strangler Figs - Strangler figs are one of the more interesting species of the Amazon Rainforest. It starts out as an epiphyte (or plant whose roots wrap around a tree branch) and extends its roots down around the tree until it eventually completely surrounds the tree, establishes its own roots and kills the host tree. Click the picture below to be taken to a great site for more information on strangler figs. 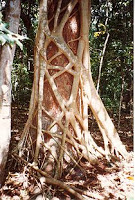
In our rainforest we learned about this interesting plant and then took the same type of paper twists that I had used for wrapping vines around the tree trunks. Only this time I used 4 or 5 white strands. I tied the paper twists to the top of the tree and let them hang down. Then I chose one student per strand and we wrapped them around the tree, kind of like wrapping a May Pole. I had the kids move over and under and backwards around the tree until we ran out of paper and I tied them off at the bottom. I'm sorry to say I don't have a picture of our classroom strangler fig.
Vines - To make vines I collected multiple shades of green and brown yarn. Then I taught the kids how to braid. (A useful skill that most did not know.) We tied our braids to the legs of our desks and then the kids set about braiding a vine. Each vine was made of two or three colors of yarn. Kids that got really good at braiding might make a second one with more strands, to make the vine thicker. When they were done, we draped the vines around the room.

Bromeliads - We always learned a lot about air plants (epiphytes) in our rainforest unit. I always liked learning about the ecosystems that can exist inside some of the larger bromeliads. As part of our study we made our own bromeliads out of toilet paper tubes and construction paper. Here are the steps we took to make them.
Materials - Scissors, tape, toilet paper tube, 3 pieces of colorful paper and 2 pieces of green paper each measuring 6" x 6" , one tracer - see shapes below

Step One - Trace and cut out the 5 pieces of paper so they look like the papers below. I created tracers out of card stock for the kids that they would use to get this shape.

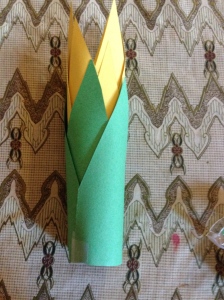
Step Two - Tape the first yellow page toward the top of the toilet paper roll. Make sure to pull it taught when you put the second piece of tape down.

Step Three - Tape the next yellow paper on a smidge lower. I like to line it up so that the points are off set.


Step Four - Continue taping each layer on making sure to pull the paper taught and making each layer a bit lower and off set from the layer above.


Step Five - I found that a few kids would have trouble getting the papers taped on tight enough and the papers would feel loose and like they were going to fall off. To help with this I often place a couple of pieces of tape along the bottom to secure the papers.

Step Six - The final step is to shape the leaves and petals. I had the kids gently pull each petal down so that they stuck out instead of straight up and down.

And there you have your bromeliad. We would then hang these from the paper towel tube vines around the classroom, since we didn't have any branches to hang them from. They made a great addition to our classroom rainforest.
Check out my next rainforest blog post to find out about the animals we added to our rainforest.

thanks for these amazing articles. love them.
ReplyDeleteShort Independence Day Quotes 2018